My Rockin' Rocking Chair
 |
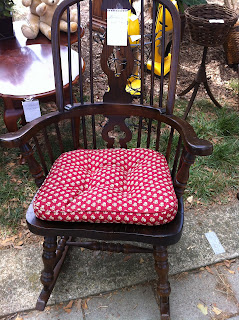
| Original rocking chair |
I had a pretty empty and sad little corner in my bedroom that desperately needed something to liven it up. I had been looking for the perfect piece to bring that corner to life and to make it functional. I was at a flea market a few weeks ago and discovered a rocking chair that was in great shape but a little dated. I have always wanted a rocking chair but definitely wanted a more modern color. I felt the stain was too dark on this chair and it would end up just blending in to that dark corner in my bedroom.
To my husbands dismay, I purchased the rocking chair which I planned to paint white. My husband also wanted something functional in our bedroom corner but did not necessarily want me to take over the dining room for 1 week to tackle this project. I went home and laid down my painters drop cloth and started to clean the chair with TSP.
TSP is a quick way to clean any wood item and prepare it for painting. I could have proceeded to sand it down until all the stain was removed, but my living room (and my husband) would not like all that dust on everything. Instead, I sanded down the rough areas and started on my first coat of white paint. I choose white as my paint color to contrast with the dark colors in my bedroom. I found that the hardware store paint brand was very affordable and easy to walk right in and pick off the shelf without having to mix it up.
Since I decided to go with white paint and I did not sand down the rocking chair I was in for a lot of work. The dark stain was very dark and it took me six coats of paint to become satisfied with the color.
 |
| After 1 coat of paint |
Each coat took me about an hour to complete since the bars and detailing on the chair were so intricate. I needed to take my time and make sure each coat was consistent since it was white and you can see any discrepancy. Once I was happy with the color I decided to take some 100 grade sand paper and distress the edges for a nice worn look. I wiped the chair down and applied 2 coats of my handy-dandy Minwax water based protective finish. I want this chair to hold up for a few years!
I ended up with a pretty awesome looking rocking chair with my own modern twist. I also now have a place to sit and read. I spent a total of $65 on this DIY project and every penny was worth it.
My finished product


Comments
Post a Comment