Hoosier Cabinet Upgrade
 |
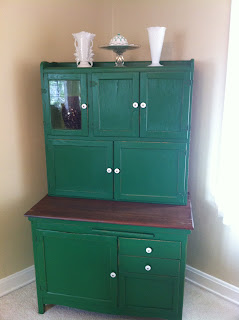
| Final Hoosier Green Cabinet |
As my first post I wanted to share with everyone how I was looking for a new DIY project and desperately needed some more storage in my new apartment. I started looking around on Craigslist for an affordable piece of vintage furniture and found an old Hoosier cabinet for $150 that needed some serious TLC.
 |
| Craigslist Hoosier Cabinet |
After getting it home my first decision was to decide what color to paint it. I knew that I wanted a bold color and something that would go with my living room, so I decided on Valspar's Vegas Green for the exterior and Crocodile Smile Green for the interior. While I was at Lowes I also picked up the following supplies to make my project go smoother. In all I left with the following:
- 6 x 9 Painters drop cloth
- Plastic drop cloth
- TSP - wood cleaner
- (2x) 2'' & 3'' foam paint brushes
- 80 grit sandpaper
- Blue painters tape (for the glass window)
- 1 qt. Vegas Green interior satin paint, latex, non oil-based
- Half pint (ie. sample size) Crocodile Smile Green interior satin, latex
- Half pint - Small minwax - water based satin urethane (finish)
 |
| This little guy is expensive but worth every penny |
Once I got home I laid the drop cloth in my dining room to cover my white carpet (yes, white!) and the plastic drop cloth on my table for protection. I did this whole project in my living room but if you can do it in a garage it would help the clean up and drying process go smoother.
It was now time to start! I disassembled the entire cabinet including removing the hinges and all the cabinet doors and drawers leaving only the cabinet frame. If your piece has been painted previously or has some pretty rough spots sand it down until it's smooth. My cabinet was already smooth so all I did was wipe it down with TSP wood cleaner to make sure it was clean before applying the first coat. Helpful Tip: TSP is potent to you may want rubber gloves when applying.
 |
| First coast of paint - I obviously needed a few more! |
After the first coat of paint I knew I would have to do a few more. Depending on the color you choose you may have to do anywhere between 2-6 coats of paint. I also decided to keep the table top of the cabinet natural to break up the Vegas Green color. Also the wood on the top of the table was in really good condition and I didn't want to hide it.

I only used the Crocodile Smile Green paint for the interior of the top portion of the cabinet. I ended up needing another sample size of paint from Lowes to complete the interior mainly because the wood was more absorbent than I had anticipated.
In total, the cabinet needed 3 coats of paint. After the 3rd coat dried I took the 80 grit sandpaper and distressed the edges for an added vintage touch. This is optional (obviously) but I really like the worn look and thought it would make the cabinet maintain a vintage appeal. I wiped the whole cabinet down and put the doors and hinges back on the frame.
 |
| Sanded edges for vintage charm |
Finally, I applied 2 coats of the minwax urethane to the entire cabinets to seal and protect all of the work I just did. Helpful Tip: This urethane is super thin so apply slowly and don't let it bubble up. I also used the urethane on the unpainted wood table top of the cabinet to give it a shine that matched the rest of the cabinet.
One more trip to Lowes to get the final detail, knobs! The old knobs were dirty and un-matching so I decided on basic white porcelain to contrast nicely with the bold Vegas Green color. Plus, they were the most inexpensive knobs at the store and I was on a budget. Perfect!
The whole project took me about 3 days and $250. In the end I got an unique piece of furniture with lots of storage that I was really proud to have in my home.


Comments
Post a Comment